1. Looking to transfer your old iPhone photos and albums to your recently acquired new iPhone or iPad? Follow the steps below and a few clicks later you’ll have all photos and albums copied over. The method transfers the entirety of your old iPhone pictures from the Camera Roll and from custom albums you created later. It works with all iPhone and iPad models and all iOS versions.

    First, copy the old iPhone photos and albums to a PC

    1. Download the following PC program from the page below

    2. Start the program and connect your old iPhone. The iPhone photos and albums appear on the left

    main program window copytrans photo

    3. Click the orange “Full backup” button on top

    full backup button

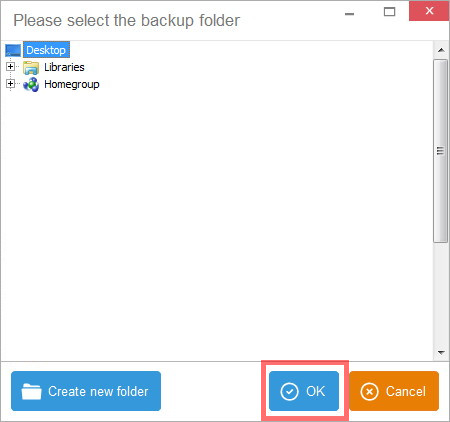
    4. Select the PC location where to copy the old iPhone photos and albums and click OK

    window to select photo backup location

    5. The photos and albums are copied to the selected location exactly as they appear on your old iPhone.

    windows explorer with photos and albums from iphone

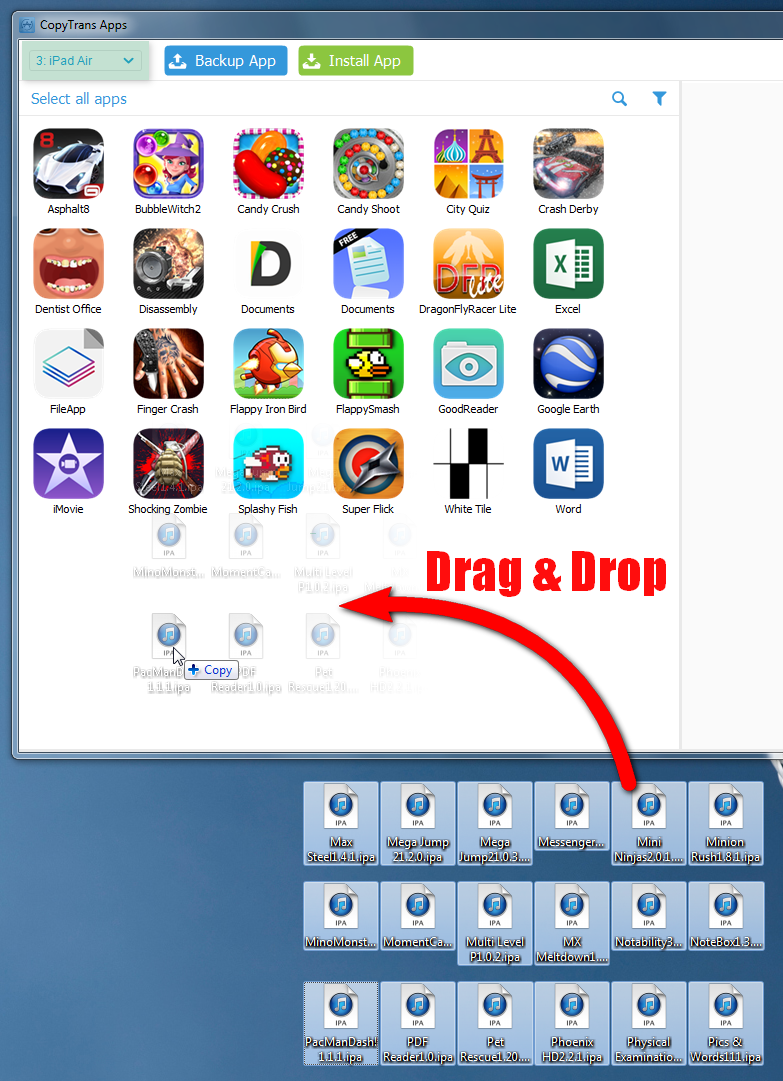
    Next, transfer the photos and albums from PC to the new iPhone

    1. With the program running, disconnect the old iPhone and connect the new iPhone or iPad to your PC

    copytrans photo main window with new iphone connected

    2. Drag and drop all albums from the PC location to the far left side of the main program window as shown below

    photos import to iphone via drag drop to the main window

    3. Click on the “Apply changes” button

    apply changes button in copytrans photo

    You now have your old iPhone photos and albums loaded on the new device. Enjoy!

    old iphone photos on new iphone

    This is how to transfer photos from one iPhone to another iPhone in just a few clicks. Learn more.

    0

    Add a comment

  2. Little by little, iTunes sheds off sync features that are not related to Apple's ecosystem. iTunes 11 scrapped sync with Yahoo contacts. Now, iTunes 12 no longer features notes sync with Outlook for iOS 9 devices. This is not the end of the world, however. You can continue syncing iPhone notes with Outlook without iTunes. Just follow these steps.

    Instead of iTunes, use CopyTrans Contacts to transfer notes between Outlook and iPhone

    Follow one of the links below to learn how to:

    2

    View comments

  3. iTunes often returns errors with a code and a vague message during iPhone backup. If you are in such a no-go situation, you’ve arrived at the right place. I’ll show you how to backup iPhone without errors and avoiding iTunes as a whole.

    Backup iPhone without iTunes

    1. First, get the free CopyTrans Shelbee tool on your computer. CopyTrans Shelbee is a dedicated iPhone backup utility that allows you to backup iOS content such as iPhone settings, apps including app documents, messages, contacts, calendars as well as camera roll photos and videos. Download the program from here:

    2. Launch CopyTrans Shelbee and connect your iPhone

    iphone connected to copytrans shelbee

    3. Click “Backup”

    button to backup in main program window

    4. Click “Full backup”

    button for full backup in main program window

    5. You can now select the location where to save the backup. To do so, click on the green icon on the right

    change iphone backup location

    On many occasions, iTunes cannot backup your iPhone due to too low disk space on your PC. CopyTrans Shelbee allows you to backup to a location of your choice like to an external drive with plenty of available space.

    6. Once you select the location of the backup, click “Start”

    start backup button selected

    7. Your iPhone is being backed up. Stand-by until the operation is complete

    iphone backup running in background

    8. At the end of the backup, click “Done”

    backup complete with success

    This is a quick way to backup iPhone with CopyTrans Shelbee while avoiding unexpected and vague iTunes error messages.

    0

    Add a comment

  4. Installing apps on your iPhone with iTunes could be a burden as it requires you to use the elusive iTunes sync. iCloud on the other hand, does not allow the installation of separate iPhone apps but rather the restore of the entire iPhone to a previous state.

    This is a quick tutorial showing you how to install individual apps and app-related data such as preferences and documents without iTunes, iCloud and without the need to jailbreak.

    Install apps on iPhone from IPA files on PC

    1. Download CopyTrans Apps on your computer. This free Beta program helps you manage iPhone apps (i.e. install, back up and transfer them) without jailbreak, iTunes or iCloud. Download it from here:

    2. After starting the program on your computer, connect the iPhone where you wish to install apps. Let your existing iPhone apps list in the window

    ipad apps loading in the program window of a pc software

    2. If you have already downloaded the app IPA file(s) on your PC or have the IPA files in the iTunes Mobile Applications folder, drag and drop those to the open CopyTrans Apps window

    install ipa files on ipad or iphone

    3. The apps are installed on the iPhone or iPad of your choice

    ipad home screen

    You can alternatively use CopyTrans Apps to transfer iOS apps and app documents from one iPhone to another iOS device. To do so, follow this tutorial: http://iphone-contacts.blogspot.ch/2014/02/how-to-transfer-iphone-apps-to-pc.html

    This is how to install apps on iPhone without the need for iCloud, iTunes or jailbreak.

    0

    Add a comment

  5. Skype recently announced a revamped new version of its iPhone app. While the new version 5 vastly improves visual appearance and style over its predecessor, it lacks a number of critical features present in version 4. The ability to send SMS messages over Skype on the iPhone was scrapped. This tutorial will help you downgrade Skype for iPhone to the previous version of the app so that you can continue sending SMS text messages to your contacts.

    1. If you don't already have the old version of Skype (i.e. v4.1) on your iPhone, download the IPA app file for that previous version from my Google Drive:

    old version of skype for iphone v4.1 on pc desktop as ipa file

    2. Now that you have the old version of the Skype app on your computer, you need to install it on the iPhone. Install the old version of Skype via using CopyTrans Apps which is a free Beta PC program that allows you to manage your iPhone apps from the computer. Download CopyTrans Apps from the following page:

    3. Start CopyTrans Contacts and connect the iPhone to your computer. You will immediately see your iPhone apps beginning to load on your PC screen

    copytrans apps displaying ios applications on pc screen

    4. Select the Skype app you already have installed on the iPhone from the main program window

    skype v5 for iphone selected in main program window

    5. From the top right-hand side, click on the "X" symbol to uninstall the app

    click to uninstall skype from iphone

    6. Confirm the removal of Skype app's latest version from your iPhone

    do you want to uninstall 1 app from iphone - copytrans prompt

    7. Now drag and drop the old version's IPA file from your PC to the left-hand side of the main CopyTrans Apps window

    drag and drop to install old version 4 of skype on iphone

    8. This will install the previous Skype version (v4.1) on your iPhone. Make sure to accept the installation popup by clicking "Ok"

    do you want to install 1 app - copytrans prompt

    9. On your iPhone Home Screen, open the newly-installed previous version of Skype and log in

    log in to skype app on iphone

    10. This is it. You can send text messages again with Skype on your iPhone!

    skype for iphone - screen to send sms text messages
    0

    Add a comment

  6. The latest version of Google Maps now offers to save street maps offline on your iPhone. This is a useful feature for those of us with slower data connections or for folks who don't have reception in a given area where they'd like to use the GPS functionality of their iPhone.

    google maps application for iphone

    Here's how to make use of the ingenious and much awaited Google Maps offline feature.

    1. Open the Google Maps app on your iPhone or iPad and tap on the user icon on the right of the top search bar

    2. Scroll down until you see "Offline maps" and tap "Save map to use offline"

    save offline maps for when your network connection is slow or unavailable

    3. Center the iPhone screen around the region whose map you wish to save and tap "Save"

    save this map pan and zoom to adjust

    4. Give the new map a name and tap "Save" again

    name offline map

    5. Stand-by until the map is saved to your iPhone memory. It can take a while especially if you are saving the map of a large city area

    6. That's it. All your saved offline Google maps appear listed under the "Offline maps" section in the app

    You can now use Google Maps even if your iPhone is out of range or in Airplane Mode. The iPhone GPS sensor will locate you on the saved map and you can start navigating your way! Enjoy!

    0

    Add a comment

  7. Did you ever wonder how to export the iCloud calendar events to your PC or to Outlook? iCloud allows you to export contacts to the computer, but not calendars. The export method below is the only way I know of to export iCloud data to PC.

    1. On your PC, download a program called CopyTrans Contacts from the following page:

    2. Run the program and connect your iPhone, iPad, or iPod Touch, then click on More > Cloud setup

    3. Now connect your iCloud account with the program by clicking on “New connection > iCloud”

    4. Enter your iCloud username and password and be sure that the checkmark next to “Calendars” is active, click on “Add account”

    5. Exit from the Cloud setup window and click on the “Calendar” icon on the left side of the main program window. The program will load your iCloud calendar event data. The iCloud calendars appear listed with a small cloud icon to the right under the “Calendars” pane

    6. Select the iCloud calendar you want to export to Outlook or to backup to your PC and click “Export” selected

    7. From the popup window choose what you’d like to do next. you can either export the iCloud calendar to Outlook on your PC (requires Outlook installation) or backup the calendar to a standard iCalendar file on your computer.

    Export iCloud calendar to Outlook

    1. To export to Outlook, click “Outlook (direct export to Outlook)”

    2. If Outlook prompts you, allow access to its database

    3. Your iCloud calendar is now exported to Outlook on the PC

    Backup iCloud calendar to PC

    1. To back up the iCloud calendar to a standard iCalendar file on your computer, click “File###” instead

    2. Select the location where you want the file containing your iCloud calendar events to be saved on your PC and click OK.

    3. Your iCloud calendar is now backed-up to an ICS (iCalendar) file on your PC. You can use this file to import the calendar to another iPhone (via using CopyTrans Contacts “Import calendars” function), or to any calendar manager which supports ICS files.

    This is a unique way to export iCloud calendar to PC.

    0

    Add a comment

  8. You don’t want to lose iPhone content you purchased especially if you misplace the iPhone or it gets stolen. To preserve important applications and app data, simply backup the iPhone apps along with other purchased items such as books or music to the PC.

    Here's how to transfer iPhone apps and app documents to your computer:

    Backup and transfer iPhone apps and app documents without iTunes or iCloud

    To back up selected iPhone apps along with app settings to PC and, if needed, to transfer them to another iPhone, iPad, or iPod Touch, use CopyTrans Apps - a free Beta PC utility.

    1. Download CopyTrans Apps from the following page:

    2. Run the program on your PC and plug in the iPhone whose apps you wish to backup. The apps appear in the program window

    iphone applications shown on pc window

    3. Select the apps you want to back up

    a selection of iphone apps on the pc

    4. Click on the "Backup App" button

    backup app button in copytrans

    5. Select the location on your PC where to save the apps and app documents

    browse for folder window

    6. Click the "Ok" button from the next window accepting the backup

    prompt window: do you want to backup 18 apps

    7. The apps are backed up in to individual IPA files. Each IPA file contains the app installation file and the associated app documents and preferences

    IPA application files saved on computer

    8. You can install the apps along with app documents on another iOS device such as iPad, another iPhone, or iPod Touch via simple drag and drop

    connect other iphone to copytrans apps

    Quick method to backup and transfer iPhone apps to iTunes

    1. Run iTunes on your PC
    2. Connect your iOS device to your computer and let it appear in the main iTunes window

      connect iphone to itunes to transfer apps to pc
    3. Press the ALT button on your PC and navigate to File > Devices > Transfer purchases

      transfer purchases itunes iphone apps
    4. If asked, authorize your PC by entering your Apple ID and password

    Your iPhone apps are now backed up to your iTunes Media folder under “Mobile Applications”.

    This is how to transfer iPhone aps to PC.

    1

    View comments

  9. There have been a number of reports that iCloud Control Center fails to sync contacts and calendars to Outlook under the new Windows 8.1. This is quick to fix.

    Contacts you add to iCloud are not automatically synced to Outlook on the PC and the same issue exists for calendars. To resolve the issue, follow the instructions below:

    Solution 1:

    1. Open iCloud Control Panel on your Windows 8.1 PC

      run icloud control center on windows 8.1
    2. Un-check the “Mail, Contacts, Calendars, and Tasks with Outlook” option and apply the changes.

      disable mail, contacts, calendars, and tasks sync in icloud control panel
    3. Now, check back the box next to “Mail, Contacts, Calendars, and Tasks”

      enable mail, contacts, calendars sync in icloud on windows 8
    4. Open Outlook on your PC and see whether the issue is resolved.

    Solution 2:

    1. Run iCloud Control Panel on the computer
    2. With the “Mail, Contacts, Calendars, and Tasks” option checked, click “Sign out”

      sign out of icloud control panel
    3. Upon prompt, click “Delete from computer” this will only temporarily delete the contact and calendar entries from your Windows PC but will not affect the data saved in your iCloud account

      do you want to keep a copy of icloud calendars windows 8
    4. Sign back in and select “Sync to Outlook”
    5. Run Outlook on the PC and see whether the iCloud contacts and calendars have been synced

    Solution 3 – Manually sync iCloud contacts and calendars to Outlook

    If the above solutions fail to resolve the issue, use the following utility to manually sync your iCloud contacts and calendars to Outlook on any Windows 8.1 PC.

    1. Download the tool from the following page. It works in a similar way to the iCloud Control Panel:

      http://www.copytrans.net/copytranscontacts.php
    2. Run the program on your PC and connect your iCloud account by navigating to More > Cloud setup

      connect icloud account on windows 8.1 without control panel
    3. Click iCloud

      add icloud account to copytrans contacts
    4. Enter the iCloud account username and password

      enter icloud username and password on computer
    5. Your iCloud contacts will appear in the main program window. You can see that these are sourced from iCloud by the little cloud icon on the left. Click on “Export selected”

      icloud contacts on windows 8.1
    6. Click “Outlook (direct export to Outlook)”

      transfer icloud contacts and calendars to outlook on windows
    7. Select the Outlook Contacts where to transfer the iCloud contacts and click OK

      choose outlook contacts folder copytrans contacts
    8. The iCloud contacts are now manually synced to Outlook on Windows 8.1 without the need for iCloud Control Panel.

      outlook contacts synced to icloud windows 8.1

    Solutions provided by Microsoft and Apple

    Let me know in the comments section below if you found more solutions for iCloud Control Panel not syncing on Windows 8.1.

    0

    Add a comment

  10. If you decided to give up your BlackBerry for an iPhone, or you are switching from iPhone to BlackBerry you might ask yourself how to transfer your contacts from one device to the other. There are several complicated guides using a multitude of tools or mysterious synchronization services, but recently when exploring CopyTrans' FAQ I found two quite simple guides on how to move contacts from BlackBerry to iPhone and from iPhone to BlackBerry.

    All you need is CopyTrans Contacts and the BlackBerry Desktop Software. To download these tools please refer to:
    After having installed both programs on your PC, please select the appropriate user guide:

    Transfer BlackBerry contacts to iPhone

    1. Run the BlackBerry Desktop Software and connect your BlackBerry to the PC
    2. If you want you can make a full backup of your BlackBerry before transferring your contacts
    3. Once done, switch to the "Organizer" tab, select "Contacts -> Windwos Contacts" and click "Configure"

      transfer contacts from blackberry to iphone
    4. For the Sync direction make sure to select "One way to your computer only" and confirm with "OK"
    5. Back in the main window click "Sync Organizer", check once again the changes that will be made und start the "Sync"
    6. All your contacts have been saved to the Windows Contacts folder
    7. Now start CopyTrans Contacts and connect your iPhone to the PC
    8. Click "Import contacts" and navigate to your contacts folder
    9. Select all contacts and click "Open"
    10. copy contacts from blackberry to iphone
    11. All your contacts have been successfully transferred from the BlackBerry to the iPhone

    Transfer iPhone contacts to BlackBerry

    1. Run CopyTrans Contacts and connect your iPhone to the computer
    2. Once the iPhone contents show up, select the contacts that you want to transfer to the BlackBerry and click "Export selected"
    3. Next, select "BlackBerry" and make sure to save your iPhone contacts directly to the Windows Contacts folder (C:\Users\YOUR ACCOUNT\Contacts), as the BlackBerry Desktop Software will only look in this folder for your contacts
    4. copy iphone contacts to blackberry
    5. Now open the BlackBerry Desktop Software and connect your BlackBerry to the PC
    6. Switch to the tab named "Organizer" and check the option "Contacts -> Windows Contacts"
    7. Click "Configure" and set the Sync direction to "One way to your device only"
    8. Confirm with OK and back in the Organizer tab click "Sync Organizer"
    9. Check if the number of contacts that will be added to your BlackBerry corresponds to the number of contacts that you exported from your iPhone and click "Sync"
    10. transfer iphone address book to blackberry
    11. That's it, you successfully transferred your contacts from the iPhone to the BlackBerry handheld
    0

    Add a comment

Loading